When the requirements for a measuring point are no longer met
You very likely already use a Coriolis mass flow meter system or some other measuring instrument in your plant. In view of the high precision which is stipulated and the fact that mass flow, density and temperature are measured directly in the process, this device is a genuine all-rounder. Yet even if though it is made from austenitic steel, the measurement tubes can be damaged over a long period of time due to corrosion, abrasion or deposits if caustic or granular media flow through them. If the condition of the tubes deteriorates in this way, your measuring accuracy will also be impaired – which is particularly annoying if the main reason why you purchased the instrument in the first place was because it fulfilled your strict precision requirements. Worse still, if you haven’t got another measurement you can use as a reference, you may not even be aware of the problem until it’s too late. It’s probably better not to imagine what the consequences might be if this instrument is used for quality assurance purposes.
Tube Health Check for the Rotamass TI … then what?
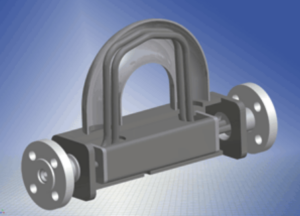
It would certainly be desirable, therefore, to know the condition of the tubes to enable possible errors in the measurements to be detected. Preventive maintenance is one possibility here. Your maintenance personnel check the condition of the instrument regularly and make sure it’s working correctly. However, they can only arrive at a robust verdict if they are able to look inside the device. That, in turn, means removing it and shutting down that section of the plant. You can save yourself the effort! Back in 2016, Yokogawa developed the patented Tube Health Check for the Rotamass TI Coriolis mass flow meter system. An excitation unit forces the measurement tubes to vibrate, this vibration being directly correlated to the stiffness of the tubes. The Tube Health Check measures the change in stiffness directly and compares it with an initial reference value based on the amplitude of the tube vibration. There are no negative impacts on simultaneous mass flow, density or temperature measurements – in other words, normal operation of the plant is not disrupted!

The Tube Health Check determines the percentage change in tube stiffness in relation to an initial reference value and in doing so assures operation within the specification. This information enables an immediate decision to be taken regarding necessary maintenance. You can add even more value by stepping away from the “now” and venturing into “tomorrow”. In order to draw well-founded conclusions, you must keep an eye on the measuring point and especially the findings of the Tube Health Check. The measurement trend tells you when the stiffness of the tubes deviates inadmissibly from the reference value and the instrument should be cleaned, recalibrated or possibly replaced. However, this method still requires the regular deployment of human resources to record and document the individual measurements.
Predictive diagnostics
Yokogawa’s solution has to do with predictive diagnostics. All you normally need to do is install the software. Do you already use a process control system for open and closed-loop control of your plant? Is a plant asset management system (PAMS) in place for your maintenance personnel? If so, then you have all of the essential hardware components for basic predictive diagnostics. The Plant Resource Manager (PRM), Yokogawa’s PAMS, is capable of diagnosing the situation in this way. You simply have to install the diagnosis application.
The PRM Advanced Diagnosis Application (PAA) takes care of tasks that would otherwise drain the resources of your maintenance staff. It carries out a Tube Health Check at regular intervals, and records and extrapolates the values. The time until a user-specified limit value will be reached is determined. If this time is less than the desired pre-alert period, an alarm is output by the PRM to warn your maintenance personnel. This leaves them sufficient time to complete other tasks upfront and also to consult on and coordinate professional maintenance both within your operation and with the manufacturer.
The concept behind the diagnosis
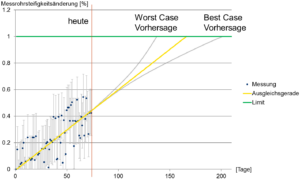
The diagram below shows the daily record as well as the predicted change in the stiffness of the measurement tubes in a simple case. Unknown, process-specific variations result in the standard deviations plotted in gray and hence the forecast deviations. The more information is available about the process, the smaller both the standard deviation and the forecast deviation will be. The specific advantage which the influence of process know-how has for you is that it reduces the difference between the worst case forecast and the best case forecast. You can thus plan your maintenance activities in a more targeted way.

Threefold benefits of healthy measuring instruments
This additional planning time helps you achieve a dramatic reduction in the costs for maintenance procedures. Even better, unscheduled downtime is avoided! This maintenance strategy works according to the principle “as late as possible, as early as necessary”. It’s a motto that ensures your measuring accuracy stays within the desired specification while giving you acceptable product quality. The benefits for you are threefold: less drain on the resources of your maintenance personnel, lower costs for maintenance procedures and higher product quality.


